Before I get onto the sleeping bag review, please allow me a minute for a little self-promotion. The subscription area of my website has had a service. Not a major 20,000 mile overhaul the mechanic does on your car every year, more of an interim 10,000 mile tweak.
Anyway, if you have subscribed then thanks. If not, I need to let you in on a little secret. From now on in, any book promotions, new book releases, and anything else I think you might be interested in, will be notified by email.
These include special Kindle book sale prices down to just $0.99 for limited periods.
I realise your information is private so I’ll never pass it on to anyone else, you won’t get spammed and I won’t bombard you with emails (I hate that, so I wouldn’t do the same to you).
Subscribers can now also read the first two chapters of any of my books for free.
Onto far more important things . . .
The ZPacks Sleeping Bag Review

I know you all love a gear review, and whilst I’ve tried to focus on other content for the blog recently, I also realise that it’s been eight months since I last did a gear review, that being the Altaplex shelter. Clearly this is not good enough so allow me to make amends.
It’s no secret that I love ZPacks gear, and for good reason. When I first saw their website back on the Pacific Crest Trail in 2010, my first reaction was that their stuff was not for me. Why? Because it was extremely minimalist. They were very focused on packs at the time, in fact that was all they were offering, and the designs were very simple, with no frills, no bells, and no whistles. Exactly how most thru-hikers like it, including me. However, because I like the little additions such as hip pockets, and indeed hip belts, to mention just two, I made a mental note to go back and look at Joe Valesko’s offerings at a later date.
That was 2010, this is 2016, and the difference is startling. ZPacks has exploded. They’ve taken on a shed load of new staff and are now in bigger premises. Their product line has grown to not just packs, but shelters, even clothing and also sleeping bags.
Early last year, I was making preparations for my Continental Divide Trail thru-hike and I needed a new sleeping bag. It had to be down (nothing beats down), keep me warm down to -7C (19F), compress well, have generous sizing options, and strike a balance approaching the minimalist theme. I looked at other manufacturers and quickly realised that if ZPacks were promising from their (then new) bags was true, there wasn’t much point looking elsewhere.
I was also looking to improving my actual sleep on trail. I don’t usually have a decent night’s kip, I don’t know why, just do a lot of tossing and turning. I made three improvements that paid dividends last year; the Zpacks bag was one, I also invested in a warmer and more generously proportioned sleeping mat (a Thermarest XTherm), and also a pillow (Klymit X Pillow). I hope to cover those, and how to get a good night’s sleep in another blog post but suffice to say, using all three of these new goodies, the quality of my sleep improved no end.
As usual with Joe and the ZPacks team, they’ve taken an existing idea, thrown out the designs that just don’t work, added new ideas that do, cut a chunk off the weight but more importantly, they’ve actually thought about what is needed in a bag and integrated some neat designs.
I’ve always had a lot of beefs with bags, in fact I hate them sometimes. I can never get the temperature rating how I like it, I always feel restricted (I call this the straight-jacket syndrome), and the down never seems to last. So, let’s address those issues, plus some more, and see what ZPacks have come up with.
Materials
The outer shell is made from very light Ventum Ripstop Nylon. Inside is a 900 fill power white European goose down, which I’m glad to say is ethically sourced as well.
The Ventrum is a new one on me, I don’t have any other gear using this material. For use on a sleeping bag I like it. It’s silly light and although my bag now has a lot of miles on it, there’s no damage, rips or tears. Two major plus points with this material – It’s very nice against the skin. Obviously Egyptian Cotton it ain’t, but it’s the most comfortable I’ve experienced.
Second, and this could be a factor of the down as well, but the bag isn’t clammy. I’ve had bags in the past that I sweat in. This is not a sign of being too warm because I know the temperatures I was sleeping in, and if anything the bag wasn’t rated down to those temperatures. It’s more about the breathability, and the ZPacks excels here. Ever tried to turn in your bag and your feet, legs, and pretty much any exposed part of your body just sticks to the inside of the bag and turns with you? That’s how poorly your bag is breathing.
No Hood
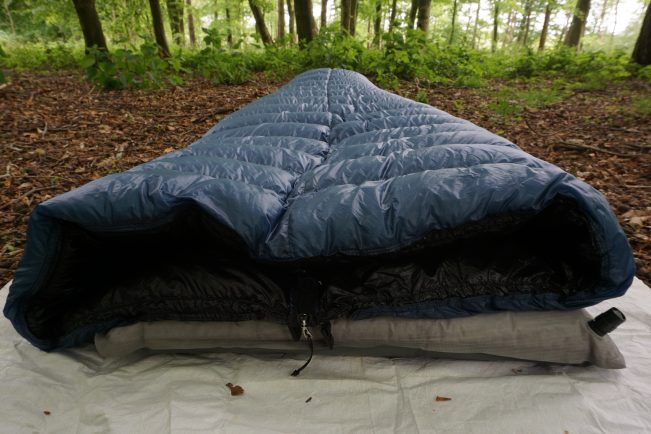
The bag design follows what we have become used to. However, there are nice tweaks and additions that make it stand out.
Firstly, there’s no hood. This is fine with me, I’ve never used them anyway because I wake up in the early hours unable to escape or find the opening to liberate myself. Hoods aren’t necessary, they add weight. All you need do is wear a beanie, or similar headwear, which you’re probably carrying anyway. Or, ZPacks have a dedicated down hat – way too warm to hike in but ideal if you can’t dispense with the need for a hood.
The zip is on the bottom
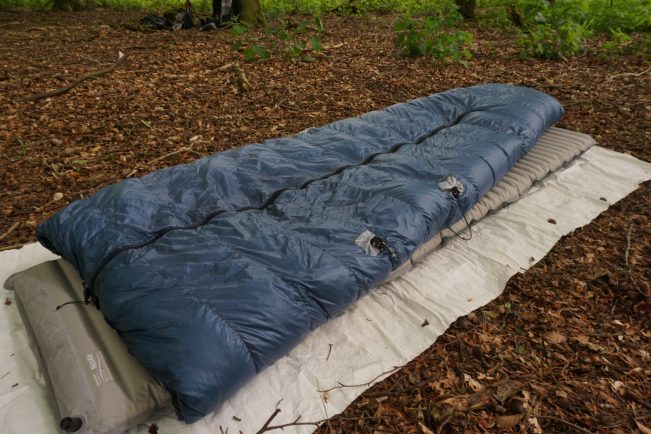
Why this hasn’t been done before now I don’t know. One of my biggest complaints up to now was side zips. I don’t like them because they restrict the movement of the down filling. Down is wonderful because you can move it around according to the temperature (more on this below). If there is a zip to one side, the down cannot move past because there is a stitch line. So, the down has to be moved the other way which is just a pain in the arse.
With the zip on the bottom, it is easy to shake the down and move it around.
It is a pretty minimalist zip, the durability worried me at first but my bag now has over 1400 miles on it and it’s still in place, working fine.
My other concern was actually sleeping on it, would it be comfortable? Again, it’s so small and thin (it’s a 48″ #3 YKK) that I’ve never felt it.
The only minor issue you may find is zipping up, or unzipping. Because it’s under you, it takes a little while getting used to reaching underneath, but you quickly get used to it.
There is a small plastic buckle at the top of the zip which fastens, to prevent the zip opening. I believe this was a minor fault reported in the early models, hence why the buckle has been incorporated into the design.
Interestingly there is no interior zip baffle, but this is a good thing. Baffles reinforce the warmth around the zip area, which can be a cold spot because there is no insulation. With the zip underneath, firstly there is no need for a baffle because your pad / mat is doing all the insulating. Second, the zip doesn’t snag on the baffle, and if there was ever a favourite place for a zip to snag, it was on the baffle. If you’re still not convinced, just order a zip baffle which is an extra.
The standard zip length is ¾ which I find perfect. You can specify a full length if required and also, even just straps. Either way, the bag opens up nicely and can be used more like a quilt for cooler nights.
Baffles – Temperature range – Ease of moving the down

There are 360 degree continuous baffles, running around the bag.
Firstly, I’ve never owned a sleeping bag where it was an easy task shifting down around. Down scores over synthetic fillings in many areas, one of them being the ability to move it around, which tweaks the temperature inside. If it’s cold, in this case down to this particular bag’s rating of -7C (19F), I distribute the down evenly around the bag and on the Continental Divide, where we had several nights right on -7C, it was spot on for me at least.
When it warmed, such as at lower elevations, I gripped the top of the bag and shook the down more to the bottom and sides, so the internal temperature was cooler.
It’s not just the ability to do this, ZPacks scores points here for making it super easy. Shifting down can be a frustrating, time consuming task which I’ve never liked, it can take ages. With this bag it takes me, at worst, around a minute to move the filling around.
I’ve mentioned the zip being on the bottom, great because it doesn’t interfere and block the down moving.
With a good shake, the down can all be shifted underneath, or conversely, all on the top. This makes for an incredibly versatile sleeping system which works across a huge range of temperatures. Although ZPacks specify the range of their bags, it extends way outside these specs.
For example, it kept me warm down to well below freezing on the CDT. When I returned to the UK, I thru-hiked across Scotland. I needed a bag good down to freezing point (to be expected sometimes even in summer up north in Scotland). But, I knew I’d also be staying in the odd bunkhouse and bothy, where it would be far warmer. To have a bag capable of performing across a wide temperature range is nigh on impossible. But, after tweaking the down, I slept comfortably down to freezing point on a few occasions, and also kept cool in one such bunkhouse, where the temperature was around 15C (59F).
This, for me, is far and away the best aspect of this bag.
Range of sizes

These are all the size options for just the 5C (40F) bag
As with shoes, packs and other equipment, we are offered a stock range of sizing. With shoes we can usually get a decent fit because the size range covers most of us. With sleeping bags it’s different. At best we have a small, medium, and large option to choose from. There’s no real option to tweak things to exactly how we like it, and feel comfortable.
For example, I like my bags generously proportioned. Because of the straight-jacket syndrome, I demand more girth. I don’t like the addition of hoods, preferring a longer bag so I can pull it over my head, which makes me feel more comfortable.
It quickly becomes clear when you look at the options available, that this bag can be tweaked to exactly how you like it. We’re not just talking small, medium and large here. In fact, I’ve tried to look at the table of sizing options on their website and calculate how many variants they offer. I’m rubbish at maths but I can tell you that it runs into hundreds. I got my bag with extra girth and extra length, and it fits great.
However, a small note. I took ZPacks advice which is to measure yourself, and tie in these measurements with the correct bag – all logical advice really. They recommend adding 6” to 8” on the girth after measuring your chest (around the thickest part including the arms) to arrive at the correct size. I would recommend adding 8” to 10” after measuring yourself.
Because there is such a huge sizing range, you end up with a bag just how long you like it. If you prefer the fit just to your neck, then size accordingly and use a hat to take the chill off if you have to. Prefer it longer like me? Size up.
It’s the same with the girth, allow a more generous fit here and you have a bag that is way less restricting inside, allowing you to turn in the bag easily, and have space to stretch out a little.
Adjustments

Zip has a simple cord, secured by a buckle. the neck draw-cord is also shown
There’s not much you can adjust on a sleeping bag. Apart from the zip (or straps if you go for that option), the only other adjustment possible is a draw cord around the top of the bag, which for most people will bring the bag snugly around the neck.
Packability
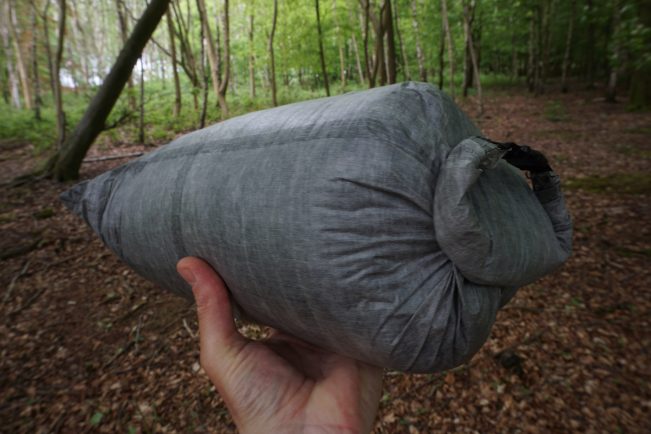
It’s pretty obvious that the lack of a hood, a more discreet zip and being filled with down, that the bag packs down well. It comes with its own, cuben fibre (sorry – Dyneema Composite Fabric as it is now known) stuff-sac. Mine weighs just 50 grs (1.7oz).
It has a rollover top with buckle, and a Velcro enclosure.
I have two, small complaints here. Firstly, a tab sewn into the bottom would help when gripping the stuff-sac to remove the sleeping bag.
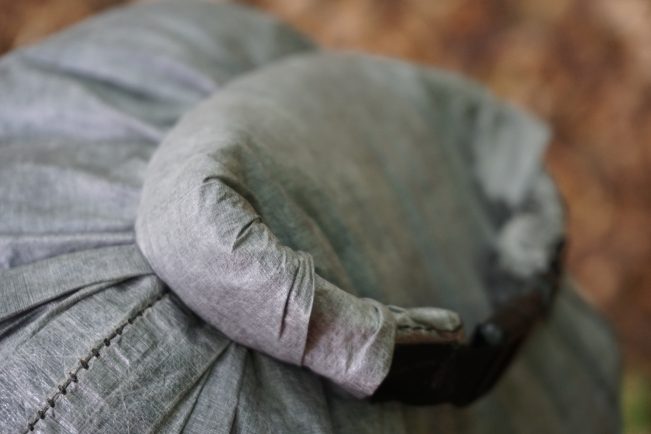
Second, despite compressing well, my stuff-sac then inflates somewhat as the down expands and draws in air, making it less compact. What’s slightly concerning is that if air is escaping, then water can get in although inside a backpack the chances are pretty miniscule that you’ll have water ingress through both barriers.
The seams have been sealed with water-proof tape on the inside, standard practice for ZPacks gear. So, I can only assume that the bag is designed to be waterproof, and if it’s water-proof, it should hold in the air as well and keep the bag compressed. It could just be a durability issue, in that the material has deteriorated over time and has an air leak somewhere.
Durability

Open thing up a little and it behaves more like a quilt
Well the proof is in the pudding I guess. My bag has over 1400 miles on it – 530 on the CDT, 600 on my Scottish trip and at least 300 on top of that with other trips.
The zip is fine, the buckle is still intact, there is no loose stitching and everything is still fine. I rarely find any down sticking out either. I’ve washed it twice and although I am very careful washing down products, it has retained its loft.
So far I have no issues in this area.
Weight
As you’d expect, impressive. The lightest bag they offer, which is a 5C (40F), regular girth, short length, weighs just 298 grs (10.5 oz). The heaviest is the -12C (10F), extra wide and extra long, and weighs just 808 grs (28.5 oz).
The combination of the Ventrum, ¾ length minimal zipper, down as a filling, and the lack of hood brings the weight down dramatically.
It just goes to show how far we’ve come in lightweight backpacking – If you carried the lightest sleeping bag that ZPacks offer, along with their Hexamid Solo shelter, and an Arc Blast pack, all of that would weight just 1330 grs (47 oz). That’s three, main gear items that are half the weight of just one backpack I was using ten years ago.
I also tweaked the design a little
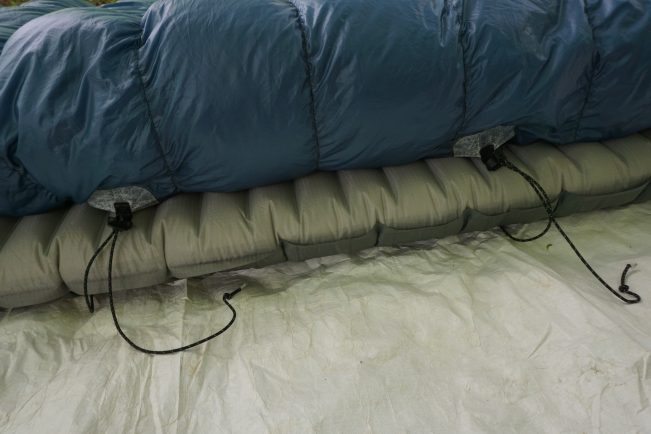
Part of my plan to sleep better last year entailed overcoming one major gripe I have with bags. I slide around a lot, sometimes even waking up off my pad and on the cold ground. I also get tangled up inside, I tend to move over in the bag, others take the bag with them as they turn. Having got the down to where I like it, I wanted the bag to remain where it was, and for me to do the shifting inside.
I needed to ensure the bag stayed right where I wanted it, so I tweaked the design with some help from Joe. My idea was to attach two lengths of cord either side of the bag, which would run under my pad. This, hopefully, would ensure the bag firstly, remained on my pad, and secondly, that it didn’t turn with me but stayed in place.
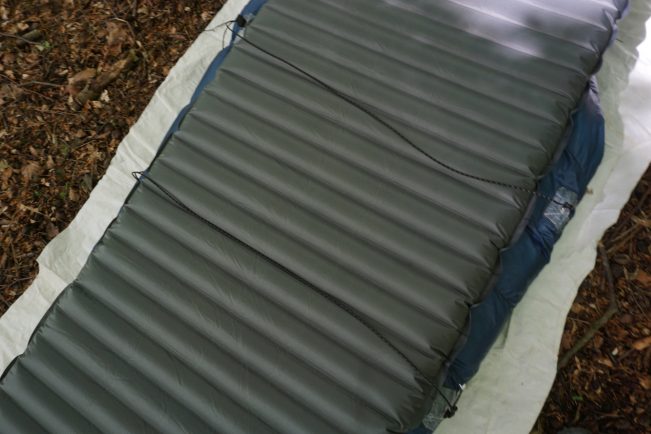
Joe supplied four, 2.5” square stick on patches with a cord loop sewn in. I positioned two of these around waist height, and the other pair about chest height, both either side where the bag meets the pad. Then, I attached a LineLoc adjuster to both loops on one side, fed through some cord, and fastened to the other loops. In retrospect now, I’d probably put one around knee level.
Once my pad is inflated, I simply slide it between the sleeping bag and the cords, tighten if needed, and it stays in place.
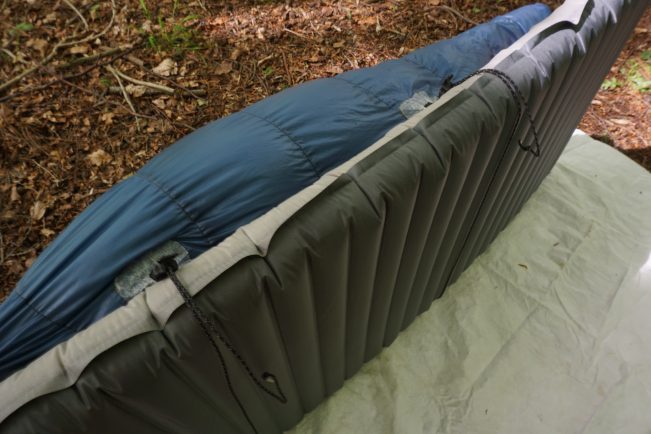
It works a treat and my bag stays put all night.
The stick on loops, known simply as 2.5” x 2.5” Stick on Loops, I had doubts about, I thought they’d come loose but those bad boys stay right where you put them, and the bag has been through the wash. They’d be perfect for an extra guy line, a torch loop in the roof of the tent or similar.

Stick on Loops – They stay in place
Price
$355 to $475 (£245 to £328 at today’s exchange).
You’ll get a delivery charge obviously.
It is always worth mentioning that your parcel may get pulled up by her Majesties Robbers, sorry, that should be Customs and Excise, where you may get hit with an import charge.
Disclaimer
I received a discount on my bag. A review was not expected by ZPacks and if one was forthcoming, it was on the understanding that it could be positive or negative.

